B486121 High Frequency Air Ionizer User Manual
Product Overview
The Botron B486121 is a high-performance benchtop air ionizer designed for higher airflow static elimination in workstation and production environments. It protects electronic components and precision instruments from Electrostatic Discharge (ESD), helping maintain product integrity and process reliability.
With increased airflow capacity compared to compact benchtop models, the B486121 is ideal for applications requiring wider coverage and faster charge decay.
In addition to electronics manufacturing, the B486121 is widely used in plastics, printing, spray coating, film production, medical manufacturing, and packaging applications—any environment where controlled static neutralization is required.
The unit is CE approved and engineered for safe, reliable operation.
Features
- Robust benchtop design suitable for desktop or production line installation
- Higher airflow capacity for extended coverage and faster neutralization
- Excellent automatic ion balance
- Power indicator and ionization indicator (green light)
- High-voltage abnormality indicator (red light)
- Automatic positive and negative ion balance — no manual adjustment required
- High-voltage monitoring system with abnormal discharge alarm
- Low high-voltage output
- High-voltage short circuit
- Abnormal high-voltage discharge
- Alarm signal output for external monitoring integration
- Durable special-alloy discharge emitter for enhanced wear resistance and stability
- Easy front louver removal and simple emitter replacement
- Adjustable blowing angle and airflow
What’s in the Box
- 1 × B486121 Main Unit
- 1 × Stand
- 2 × Knob Bolts
- 2 × Rubber Pads
- 1 × Instruction Manual
- 1 × AC/DC Adapter (ground terminal included)
Quick Start Guide
Installation & Operating Location
Position the unit where the power switch and indicator lights are clearly visible and accessible.
Keep the device away from water, oil, high temperatures, high humidity, and excessive dust.
⚠ Do not operate the device in flammable or explosive environments.
⚠ Do not insert objects into the air inlet louver. Keep airflow unobstructed at all times.
Usage Instructions
- Install the main unit onto the stand.
- Place the rubber pads between the main unit and stand. Adjust the angle and tighten the knob bolts securely.
- The unit may be used on a desktop, integrated into machinery, or mounted on a production line using the mounting holes (3-φ4.5).
- Connect the supplied AC/DC adapter to the main unit and plug it into an AC power outlet.
- ⚠ Do not use an alternate AC adapter.
- Turn on the main power switch.
- The electrodes will generate corona discharge and produce ionized airflow through the front louver. Charged objects within the ionization area will be neutralized rapidly.
- Adjust airflow using the airflow control knob as needed.
- The device automatically maintains ion balance — no adjustment is required.
- If the red alarm indicator illuminates, power off the unit, inspect and correct the issue, then restore power.
- Turn off the power switch after operation.
Power Inlet & Abnormal High-Voltage Alarm Signal Output

The rear panel includes the AC/DC power inlet and alarm signal output terminals.
The B486121 is equipped with a high-voltage (HV) abnormality monitoring system. When a fault condition occurs, the red alarm indicator will illuminate and an alarm signal will be exported through the signal output terminals.
The alarm signal will activate under the following conditions:
• Low high-voltage output
• High-voltage short circuit
• Abnormal high-voltage discharge
This signal output can be connected to external monitoring equipment, such as indicator lights, buzzers, or control systems, for remote fault notification.
Daily Maintenance
Regular cleaning is essential to maintain optimal ionization performance.
Cleaning the Front Louver
- Press the side tabs inward to remove the front louver.
- Clean using a cotton swab or a neutral detergent solution.
- Reinstall only after completely dry.
Cleaning the Discharge Emitter
Dust and contamination may accumulate at the needle tip over time.
- Exercise caution — the emitter tip is sharp.
- Clean gently using a cotton swab (recommended every 100 hours of operation).
- For heavy buildup, use alcohol with a cotton swab.
- Do not damage or loosen the discharge needle.
Replacing the Discharge Emitter
- Press and rotate the needle base clockwise to loosen.
- Use a tool to carefully remove the needle.
- Install the new needle.
- Rotate the base counterclockwise to secure.
Clean the Filter
- Wash with a neutral detergent solution.
- Reinstall only after completely dry.
⚠ NOTE: Failure to perform regular cleaning will reduce ionization efficiency.
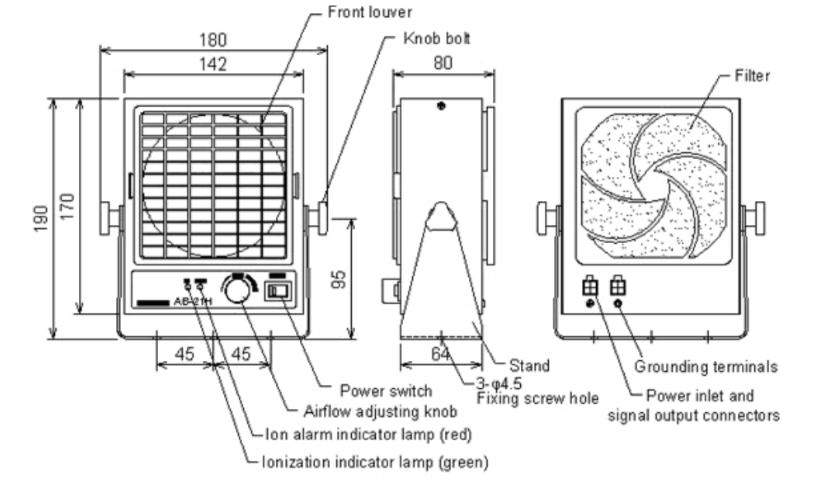
Dimensions and Parts
Technical Specifications
Power Supply Voltage
- AC100-240V 50/60Hz
Current Consumption
- 12 VA
Output HV
- AC2200 V
Airflow
- 50-120 CFM
Noise Level
- 60 dB(A) at 1 meter
Allowable Temperature
- 0-40℃
Allowable Humidity
- 20-70%RH(non-condensing)
Ozone Generation
- Less than 0.01ppm
Weight
- 1.27 kg(including stand)