ELITE On-Demand ESD Test System Calibration
Purpose:
Performing calibration/verification of the ELITE On-Demand ESD Test System using the Botron DECABOX.
Equipment
- B88500 Botron DECABOX
- Test Leads (2)
- Ground Cord, (0 Ohm resistance 4mm banana to 4mm banana)
- 7ft Footplate Cat5e (ethernet ) cable
- ELITE On-Demand ESD Tester
- OEM 12V power plug for the ELITE
- ESD Wrist Strap
Setup
IMPORTANT: Check and make sure your outlet is properly wired and free from electrical faults before making connections, do not attempt to connect to electrical receptacles under fault.
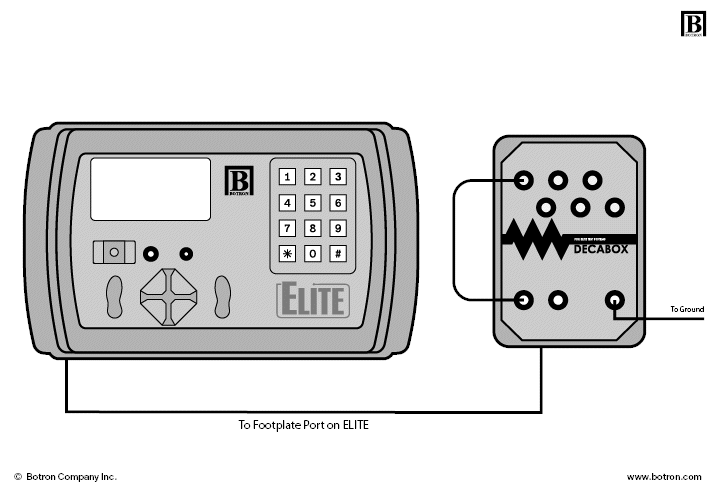
Figure 1 shows the physical connections between the ELITE On-Dmeand ESD Test System and the Botron DECABOX.
- Using the provided ground cord, connect the Ground port on the DECABOX to your EGC (Equipment Ground Conductor).
- Using the footplate cable (Cat5e), that is supplied with your ELITE, connect the ELITE from the footplate jack to the RJ45 input jack on the DECABOX.

Note – wearing a grounding wrist strap while calibrating the ELITE will produce the best results.
Calibration Values
| DECABOX Resistor Loads | ELITE Input Devices | Tolerance |
| 1M Ω | Wrist, Dual Wire, Footwear | 10% |
| 10M Ω | Wrist, Dual Wire, Footwear | 10% |
| 100M Ω | Wrist, Dual Wire, Footwear | 15% |
| 1000M Ω | Footwear | 20% |
Note – There is no specific order from 1M to 100M (and 1000M) you need to cycle through. The ELITE will determine the resistance load automatically.
Calibration Mode
Entering Calibration Mode
- While holding the 1 key on the keypad, power up the ELITE On-Demand ESD Test System.
- Select the device you wish to verify by pressing the assigned number on the keypad.
- 1 – Wirst (Single Wire)
- 2 – Wrist (Dual Wire)
- 3 – Left Foot
- 4 – Right Foot
Wrist Strap and Dual Wire Verification
Figure 2 shows the physical connections between the ELITE On-Demand ESD Test System and the Botron DECABOX for wrist strap resistance loads.
Refer to the “Resistance, input and tolerance table” to confirm your measurements are within OEM spec.
- Press 1 on the keypad to select Single Wrist Strap.
- Connect the test lead into the Single Wire Wrist Strap port on the ELITE.
- Insert the opposite end of the test lead to the 1M input on the DECABOX.
- Write down the value displayed on the ELITE.
- Leaving the test lead inserted into the ELITE, remove and cycle through the additional resistor values on the DECABOX, 10M and 100M.
Note – 100M and 1000M may take longer than other values. Please allow ample time.
You will repeat the above process for the Dual Wire input. For Dual Wire 1M and 10M should be within 10%, and 100M at 15% tolerance.

Left and Right Foot Calibration
Figure 3 shows the physical connections between the ELITE On-Demand ESD Test System and the Botron DECABOX for Right and Left foot resistance loads.
You will need to first remove the test leads from the ELITE and the DECABOX.
- Press 3 on the keypad to select Left Foot.
- Connect the test lead to the Left Foot input on the DECABOX.
- Insert the opposite end of the test lead to the 1M input on the DECABOX.
- Write down the value displayed on the ELITE.
- Leaving the test lead inserted into the Left Foot input, remove and cycle through the additional resistor values on the DECABOX; 10M, 100M and 1000M (1G Ohm).
Note – 100M and 1000M may take longer than other values. Please allow ample time.
You will repeat the above process for the Right Foot.
- Remove the test lead from the Left Foot input and connect it to the Right Foot input on the DECABOX.
- Press 4 on the keypad to select Right Foot.
- Cycle through the resistance inputs and write down the resulting measurement for each.
Record Keeping
Calibration Data will need to be manually recorded as shown on the screen during calibration. We have provided a calibration template you can download here: Calibration Template
Troubleshooting
- If you incur problems, please check your ground connection.
- If the values in your calibration data are lower than expected please try to calibrate one more time, again checking ground. If the device fails for a second time, contact Botron for an RMA Repair.
- If anything else should arise, give us a call we are happy to help!