ELITE DataSystems User Manual
Connecting Elite DataSystem To A Database

Supported Database Connections:
- Microsoft Access (Default)
- Microsoft SQL Server (Enterprise Only)
- MySQL (Enterprise Only)
By default, ELITE DataSystems (EDS) will install a Microsoft Access database on the local machine. With EDS Basic, this database is restricted to its install location. Enterprise licensing allows you to move your database file and connect to additional supported database types.
Database Configuration
To view information regarding the database connection inside of EDS:
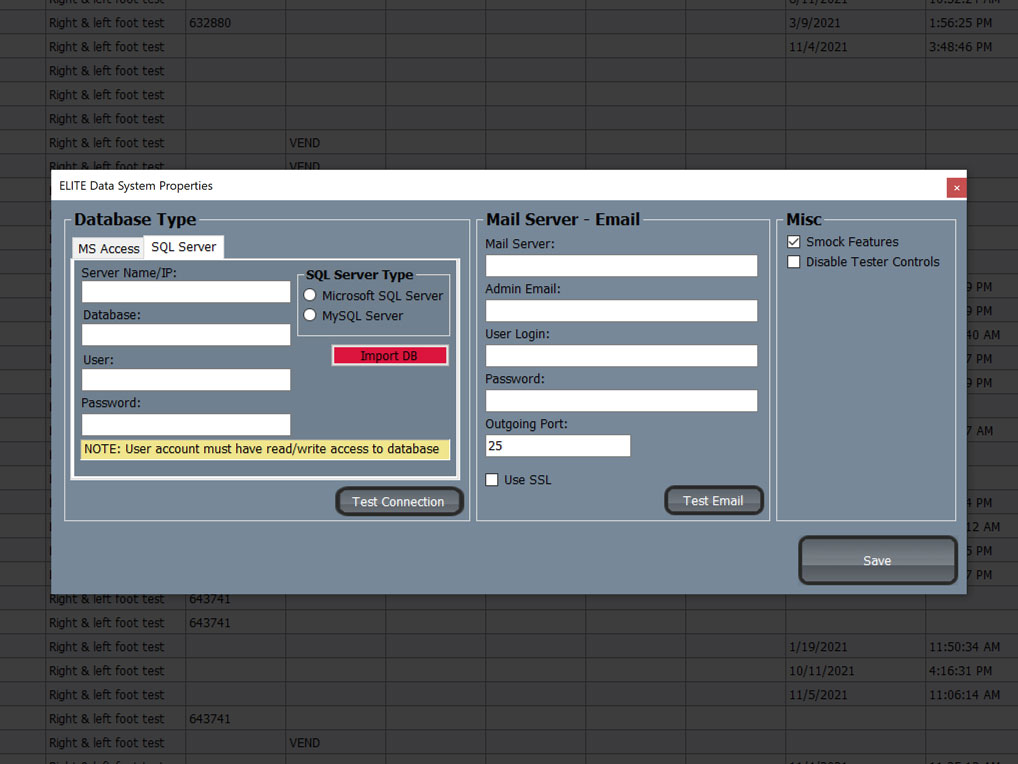
- Navigate to Edit in the menu bar → select Properties.
Microsoft Access
Access database storage is only limited to the disc space of the local machine.
Locating the file path of Access database file:
- Navigate to Edit → Properties → Database Type → MS Access.
To move the database file to a different directory or remote machine you must have an Enterprise license.
Microsoft SQL Server
EDS will automatically generate the necessary tables once connected to the database. Your database admin will need to provide the location of the SQL database, database name, and login username and password.
IMPORTANT – The login username must be using SQL authentication as Windows authentication is not supported.
To configure MSSQL connection credentials in EDS:
- Navigate to Edit → Properties → Database Type → SQL Server.
- Select Microsoft SQL Server from the SQL Server Type area.
Fill in all the appropriate fields. After, test your connection. If a connection to the database is successful, click save. You will be required to restart the EDS. Upon restarting the EDS, all data will begin to be stored in the chosen SQL database.
Oracle MySQL Server
EDS will automatically generate the necessary tables once connected to the database. Your database admin will need to provide the location of the SQL database, database name, login username, and login password.
To configure MySQL connection credentials in EDS:
- Navigate to Edit → Properties → Database Type → SQL Server.
- Select MySQL Server from the SQL Server Type area.
Fill in all the appropriate fields. After, test your connection. If a connection to the database is successful, click save. You will be required to restart EDS. Upon restarting EDS, all data will begin to be stored in the chosen SQL database.
IMPORTANT – It is recommended that the “max_allowed_packet” size be increased to 536870912 or greater. This can be changed within the MySQL Workbench by clicking Server → Status and System Variables → System Variables.
Configuring a Mail Server – Email
EDS supports the utilization of a mail server. This enables EDS to send various types of data via email. Namely, Automated Reporting. This section will go through the process of configuring and connecting to a mail server.
To view information and/or configure the Mail Server:
- Navigate to Edit in the menu bar → select Properties → Mail Server – Email.
Email Configuration
- Mail Server – Outgoing SMTP (smtp.my-domain.com)
- Admin Email – Reply to/Sender Address (typically the same as the user login email)
- User Login – Email account (my-name@my-domain.com)
- Password – Email account password
- Outgoing Port – The port number for you mail server
- Use SSL – When using a secure port
IMPORTANT – If you are using 2FA you may need to provide what is called an “app password” to permit EDS to use your email account. Contact your IT admin for more information.
When all information is filled in, test your connection by clicking on Test Email. EDS will send a test email to the Admin Email you provided. Once you have received the test email, Save and restart EDS.
Users Profiles


User Profiles, or more simply “Users”, are individuals who will be testing on the ELITE Test System from day to day. The Users tab is your primary interface for configuring and managing important profile details. For example, Test Requirements and Test IDs used for employee authentication and compliance at your ELITE Tester.
User Profiles can be created, deleted and edited in bulk. Additional features such as certifications and PTO are available with EDS Enterprise.
Adding Users
To add a user, select the User Add/Edit from the sidebar.
- Test ID – Badge Number
- Primary authentication of User
- Numeric only, max length – 12 digits
- User ID – Employee ID
- Secondary authentication of User
- Used when 2FA is enabled
- Alphanumeric, max length – 12 chars
IMPORTANT – User ID’s and Test ID should never collide. Meaning, no ID’s in your table that are the same. If 2FA or User ID authentication is enabled, this will cause conflict at the ELITE Test System.
Bulk Import/Create:
EDS allows you to import a table of users. This can be a much more efficient way to add User Profiles. EDS will assist this process by creating a template for you to work with.
- Make sure Microsoft Excel is installed
Creating User Template:
- Navigate to Edit in the menu bar → Users → Create User Import Template.
- Select a directory to save the import template.
- Open the template in Excel.
Adding data to the Import Template:
- Copy and paste data from your user list into the corresponding column of the Import Template.
- Do not include special characters or accents in User Name Fields.
- Make sure the Test ID’s are numeric only.
- Save
The Import Template includes example data for Test Requirements. This data is ignored, you do not need to edit or delete it. However, you may use these examples by copying them to the User Profile rows.
Importing the User Template:
- Navigate to Edit in the menu bar → Users → Import User Table.
- Locate and select the user table you’ve created.
- Import.
Depending on the size of your user table importing could take a few minutes. Duplicates will be flagged and removed. Check the User Profile List in EDS once complete.
Editing User Profiles
To edit a User Profile, select the check box next to the user in the user table. From here, information can be changed and updated. To apply edits, click the Update button.
Bulk Edit
You can selectively choose User Profiles individually from the user table, or by using filters and clicking on the Select All button. When the User Profiles are selected you may apply bulk edits to the profiles. When finished click Update.
User Profile Historian
By double clicking on a User Name, you can view each User Profile individually. This will display historical test records for that user. In addition, this window will also display Pass/Fail rate, PTO schedule (if entered in EDS), and Certifications.
This table of data can be exported.
If you wish to query user test history for Auditing reasons, it is recommended to do so from the Test Results window.
Creating Departments, Supervisors and Shifts
Departments, Supervisors and Shifts are all created in the User interface. These fields are to help better organize User Profiles and filter data for Reporting.
Departments and Supervisors
- From the sidebar select Department or Supervisor.
- Enter the name of the Department or Supervisor and click Add.
- Once the entry is saved in the list, select a User Profile(s) and click Update User.
Departments and Supervisors may be deleted by clicking on the entry.
Shifts
- From the sidebar select Shift.
- Select the day(s) and time for the shift schedule. Time is constant and applied across all selected days.
- Once the entry is saved in the list, select a User Profile(s) and click Update User.
Shifts can be edited or deleted by clicking on the shift from the list.
Certifications
Certifications can be created and applied to a single User Profile or Group of User Profiles. Certifications have a date range.
- From the sidebar select Certification.
- Enter a unique name into the form field.
- Choose Start and End dates.
- Click Add.
- Once a Certification is created, select the cert from the list and desired User Profile(s) from the user table, click Update.
You can apply a certification filter to Reporting. When a User Profile has an expired certification the Report will inform the recipients of that report.
PTO
PTO (Paid Time Off) schedules can be created and applied to a single User Profile or Group of User Profiles. PTO has a date range.
- From the sidebar select PTO.
- Enter a unique name into the form field.
- Choose Start and End dates.
- Click Add.
- Once a PTO entry has been created, select the entry from the list and desired User Profile(s) from the user table, click Update.
When it comes to reporting and data, without PTO applied users will display “Not Tested”. With PTO applied, users will reflect “On PTO”. This helps separate untested individuals from those out of the office. This feature is beneficial for auditing tasks.
Syncing Users to the ELITE Test System
Once you’ve added or updated User Profiles you will need to sync the profiles to the ELITE Test Systems. The information passed is what authenticates the user and displays the User Name and Test Requirement on the ELITE.
- Navigate to Devices.
- Select an ELITE from the Device List, or click “To All Units”.
- To All Units will write the user table to all online devices.
- Click Upload Users.
Test Results
The Test Result window displays all historical test records captured by the ELITE Test Systems. There are 20 data points available for filtering.
- Overall Result – Result of Test Requirement. Pass, all devices pass. Fail, one or more devices failed, Pass High, one or more devices is close to failing. All thresholds are configurable in the ELITE WebUI.
- Each technical device (Wrist Strap, Smock, Footwear) is recorded. Each display the resistance value and result (Pass/Fail/Pass High)
- Serial Number – Device where the test was performed.
Filtering Test Results
Use the User Filter to filter test results. You can filter by ID type, Department, Test Result, Test Requirement, and more. You may also apply a date range to the filter.
- Show Unknown Users – Displays Test Results of unrecognized users.
Exporting Test Results
To export the results, either with or without filters applied:
- Navigate to Edit in the menu bar → Export Test Data → choose format Excel or Text.
- Name and Save file to desired location.
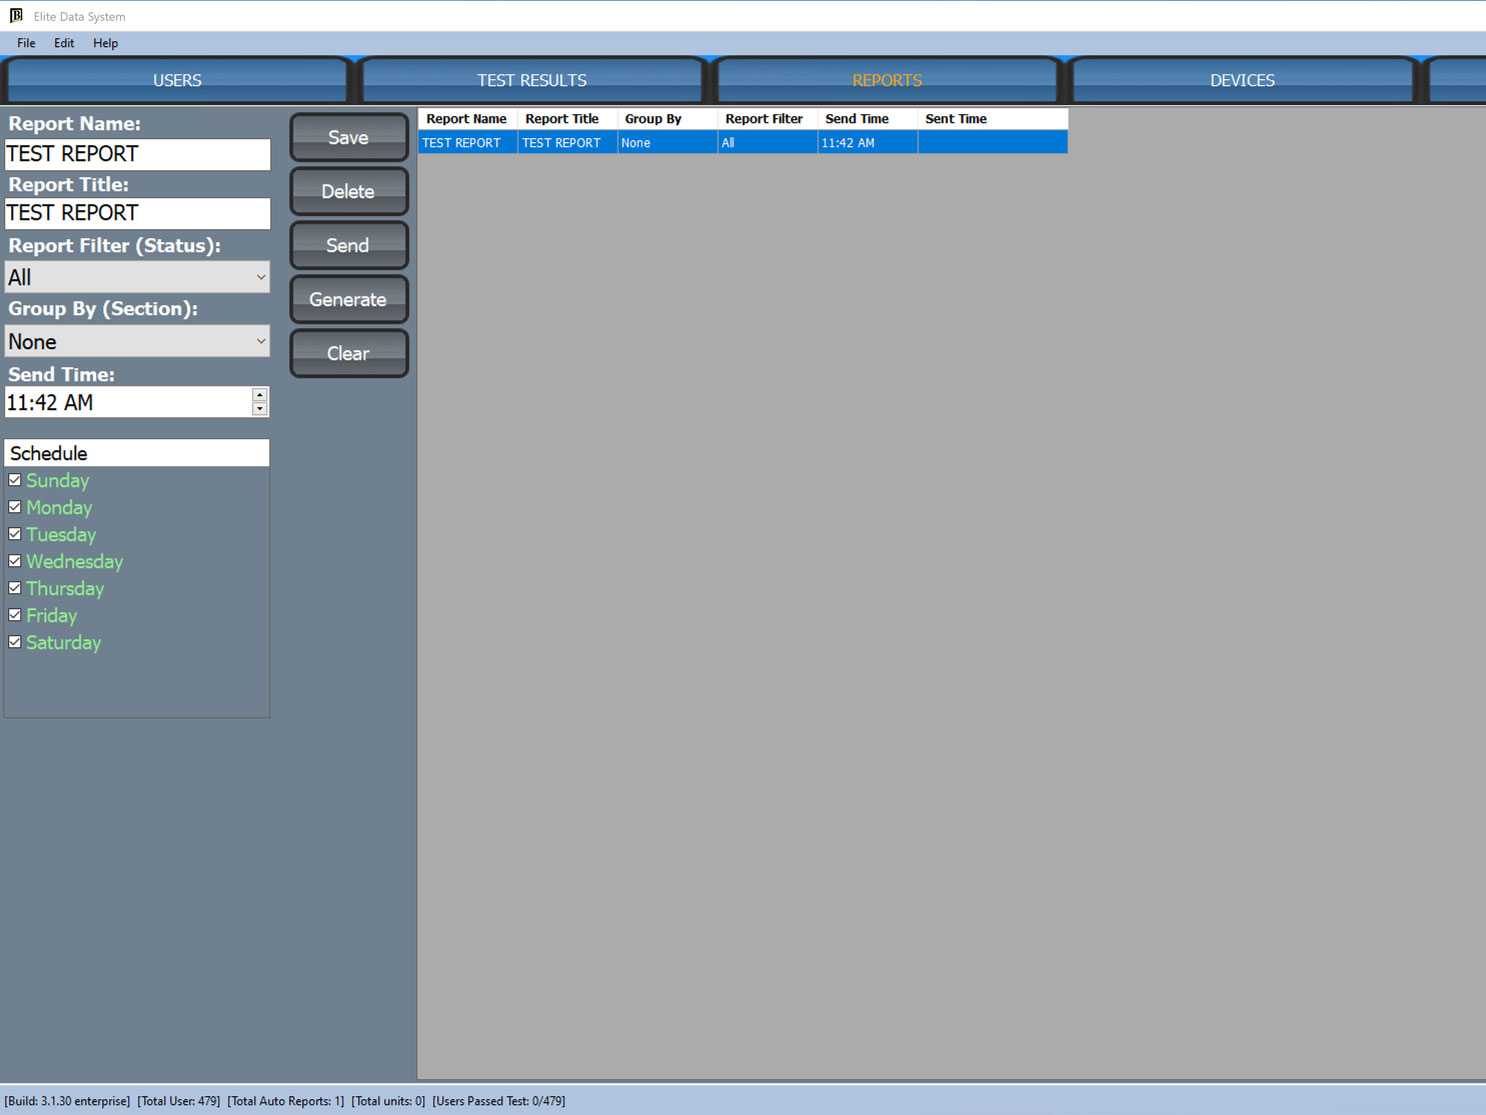
Reporting

Reporting can be used to generate reports on the fly or scheduled for automated delivery (Continuous Auditing). Continuous Auditing is a daily routine that ensures your ESD controls are effective and your program is meeting the requirements of compliance.
- Report Name – Name of report file and entry. For example, “Morning Shift Failures”.
- Report Tile – The name that appears in the report.
- Main Report Filter (Status) – This will only show test records of the type selected.
- Grouping – This will group test records together for easier viewing.
- Send Time – The time that EDS will compile and send the report. Must have Mail Server configured.
- Schedule – The days the report will be generated.
Note, reports show the latest test records by default. You can configure the reports to include the prior test results in the Report Filters.
Report Options
Report Filters
Each checked filter will include additional data to your report.
Email Recipient
This is the email address you want the report to be sent to.
- To add emails, simply enter an email address in the field below and click Add.
- Select the email address for the recipient(s) of the automated report. Multiple recipients can be selected for any given report.
Department Filter
This filters out all data to only include the departments selected.
- This can declutter your report and make them easier to read by sending only data relevant to the recipient.
- To add Departments Users > Department.
Supervisor Filter
This filters out all data to only include the supervisors selected.
- This can declutter your report and make them easier to read by sending only data relevant to the recipient.
- To add Supervisors Users > Supervisor.
Shift Filter
This filters out all data to only include the shift selected.
- This can declutter your report and make them easier to read by sending only data relevant to the recipient.
- To add Shifts Users > Shift.
Report Options
- Excel – Report email is sent with an Excel file attachment.
- Embedded – Report email includes report tables/data in the body of the email message.
- Zip – Report email is sent with a data file inside a compressed zip file.
- Access Denied and No Test Omit – Includes data for these access requirements.
- All – Includes all test records starting at 12am of that day.
Creating An Auto Report
The creation of a report requires some information in order to be generated/sent. The required information to create an automatic report includes Report Name, Report Title, Time to be sent, Days to be sent, recipients email, and any filters that wish to be placed on the report. Adding filters to reports allows data to be presented for a specific range of users rather than an individual or all users. Once all required items are entered, click the Save button to create/save the auto report.
Generating A Single Report
Reports can also be generated manually, at any time. To do this, simply select an existing report profile or create a new one, click Generate. The generated report will be a htm file that can be opened with an internet browser such as Google Chrome.
Devices Tab


The Device tab within the EDS is where Elite Test Systems and Sentinel Continuous Monitoring Systems can be added and viewed.
Device List
The device list is a sortable table view of all devices on your network. Equipment such as the ELITE and Sentinel appear in this list that have established prior connection with EDS.
Online/Offline Status
Devices that are online are white. Devices that are offline are gray.
Device Information
The list view contains information regarding your equipment including the IP, MAC, Network Latency, ID Count (User Profiles stored on an ELITE), and more.
You can quickly access the ELITE WebUI of each device by double clicking the IP Address.
Communication Status
This window displays information regarding communications between EDS and your equipment. Some of this information includes, user table upload and update status, receipt of test records and the device serial number. Information will appear as EDS cycles through the Device List.
Uploading Users
To sync User Profiles in EDS with the User Table of the ELITE, select the ELITE from the device list and click Upload Users from the side panel.
ELITE Test Systems are the only devices that support User Profiles.
Adding Devices to EDS
The side panel provides fields for you to add devices to EDS. In most cases EDS will automatically detect and add devices. However, not every network permits auto-discovery. If your device is not automatically discovered use the side panel to add them manually.
Find Online Unit
This field allows you to enter the IP address of a device and search for it on your network. If the unit is discovered EDS will add it to the Device List.
Add Offline Unit (Manually Adding Devices)
If a device does not appear from auto-discovery or searching you can use these fields to add it manually. Please select the Device Type and fill in all required fields. Once complete click Manually Add Unit.
Removing Devices
To remove devices the device must be offline. To force a device offline, disconnect your device from the network or power the unit off.
Once the unit appears offline in EDS (grayed out):
- Select the device from the Device List.
- Confirm your selection by referencing the serial number in the Selected field.
- Click Remove.
ELITE Sentinel
Sentinel Console
The Sentinel Console provides a single pane view of your Sentinel Continuous Monitors. From this view you can see all of your networked Sentinel monitors and their current status (Live View), view historical records (CM Events) and create Reports.
Live View
When a Sentinel has been added to EDS it will appear in the Live View. Live view provides near real-time feedback, including measurement data and status indicators for both operators and the mat.
- Tag – Unique ID for the Sentinel. The Tag can be changed on the ELITE WebUI.
- Location – To change or add the Location identifier please navigate to the ELITE WebUI.
CM Events
Historical monitoring events/records can be viewed by selecting a device from the Live View list. When selected, open the CM Events tab in the sidebar.
Filtering
To filter the event types please navigate to the Display Settings tab. By default all event types are active. Toggle individual event types to show or hide them.
Deleting Events
To delete the events from the database please navigate to the Display Settings tab. You can permanently delete events from the database through a scheduled action or on demand.
Exporting
To export your data please navigate to the Display Settings.
Reports
The reporting interface allows you to schedule automated reports or build reports ad hoc.
To create a report:
- Click Reports tab
- Click New
- Enter a Report Name and Title
- Select the attachment format – HTML, CSV, Zip
Filter report data:
- Click the Filter tab
- Select Events types to be included in Report
Schedule automated report delivery:
- Click Schedule
- Choose Time and Day(s) for delivery
Recipients:
- Click the Email tab
- Enter a valid email into the field
- Click Add
- Once the email address is added to the list, select the email.
Click Save to save your report. Your automated report will be sent at the time of each day you have chosen.
To generate a report on the fly:
- Select an existing report or create a new report
- Choose filters (optional)
- When ready click the Generate tab, and click the Generate button.
- You may click Send to email the report. Please make sure you have selected a recipient from the Email tab.