ELITE On-Demand ESD Test System Manual
Getting to Know Your ELITE ON-Demand ESD Test System
This guide shows you how to assemble and wire your ELITE ESD Test System, and it gets you ready for everyday use, testing ESD Wrist Straps and ESD Footwear. Please read this document and check that your system is set up carefully before you first use your ELITE ESD Test System.
Hardware Setup
Tools
For your reference, we have included an illustrated list of all components to help with the installation of your ELITE Test System.

Mounting the Wallplate
- Install 4 ‘A’ screws through the back of the Wall Plate and into the ELITE ESD Tester.
- Install 4 ‘B’ screws through the Wall Plate onto the desired wall location (recommended 4 feet from the floor) with a clear area below for a footplate.

Wiring the ELITE ESD Test System
As you will notice, the wall plate comes with pre-cut wire channels for cable management.
- Using the wire channels, connect the DC Output and RJ45 cable to their respective ports on the bottom of the ELITE ESD Tester.
- Connect the other end of the RJ45 cable to the footplate.
- Grounding Your Footplate
- Using the supplied Ground Cord, insert the banana plug into the footplate.
- Connect the ring terminal for the footplate ground to a known good ground connection.
- Once you have connected your cables and wires, plug in the ELITE ESD Tester Power Supply (the ELITE will automatically turn on).

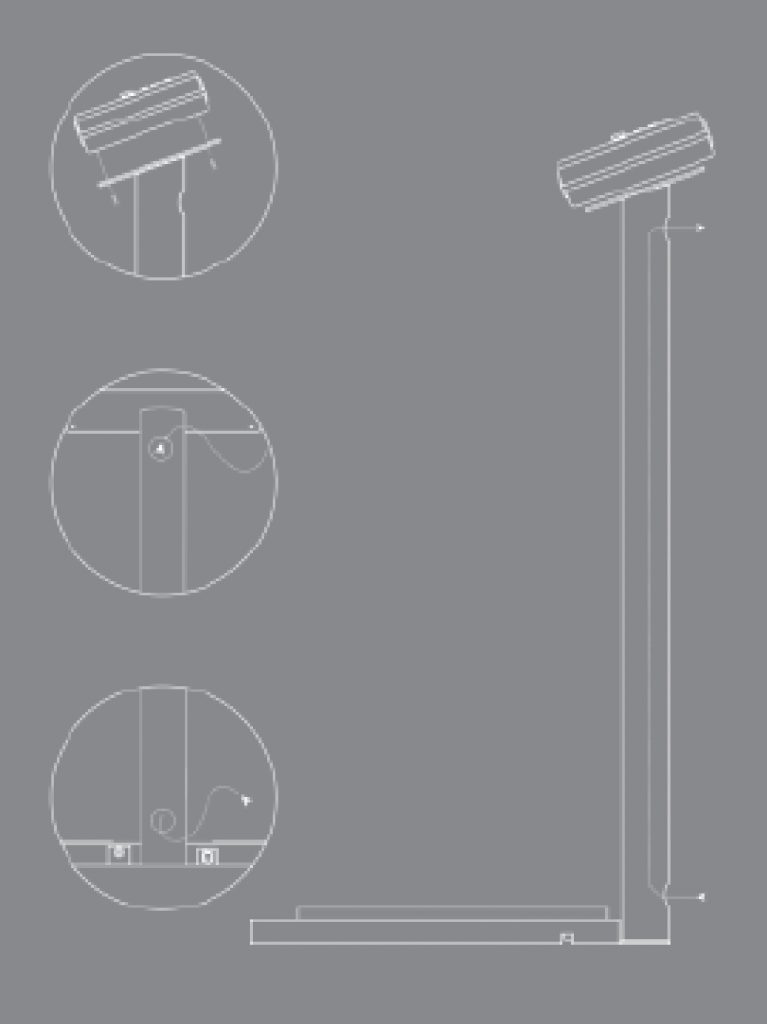
Mounting the Footplate
The ELITE footplate comes with 4 pre-drilled holes on the underside to securely mount the test stand pole to the footplate.
- Lay the test stand pole on its back with the footplate mounting bracket pointing upwards.
- Mount the footplate to the test stand pole using 4 ‘A’ screws into the underside of the footplate.

Wiring the Footplate
Once you have completed the previous section (Mount Your Footplate):
- Feed the RJ45 Cable and DC Output from the Power Supply through the bottom rear opening of the Test Stand Pole. Pull the cables through the pole and out the top rear opening.
- Connect the RJ45 Cable and Ground Cord to the footplate.
- Connect the ring terminal of the Ground Cord to a known good ground.
- Connect the DC Output and RJ45 Cable into the bottom of the ELITE ESD tester.
- Connect the Power Supply into a 120V AC outlet.
Connecting the Relays
There are two relays, A & B, on the bottom of the ELITE ESD Tester. Each relay has 3 inputs; Normally Open (NO), Common (C), and Normally Closed (NC). How you wire to your ELITE depends on the type of switch on your external device. Once you have determined the type of switch, follow the illustration for the connection procedure.
Relay A is triggered on an entry event (passing test result), acting as a switch to control outside gates, such as doors, light towers, and turnstiles upon a passing test result.
Relay B is non-operational

Powering the ELITE ESD Tester
To power on the ELITE ESD Tester plug the power block into a 120V wall socket (power block supports 120V/240V with the correct plug/prong adapter). Next, insert the power adapter into the 12V port on the bottom of the ESD tester.
IMPORTANT – ONLY use the OEM supplied 12V powers supply. DO NOT USE 24V.
Once connected the ELITE will power up. Allow the ELITE to boot uninterrupted to begin using.
Customizing ESD Wrist Strap and Footwear Test Settings
When powering on the ELITE On-Demand ESD Test System press and hold the # key on the keypad for 3 seconds. Once you release the # key the ELITE will enter into the Test Settings menu (Range Mode), where you can change the limits of the test ranges (low and high), as well as select the test requirement for your ELITE ESD Tester.
Menu Navigation:
- ✴ key to move backwards
- # key to move forwards
- Use the numerical keys on the keypad to enter/edit the resistance value
After customizing the Test Ranges the final screen is where you can select the test requirement:
- Wrist test
- Foot Test
- Wrist and Foot
- Wrist or Foot
To check and see what resistances are currently active, press and release the # key on the unit while the ELITE is powered on.
Calibrating The ELITE ESD Tester
When powering on the ELITE On-Demand ESD Test System press and hold the 1 key on the keypad for 3 seconds. Once you release the 1 key the ELITE will enter into Calibration Mode.
Please follow the instruction in the ELITE On-Demand Calibration document to perform calibration/verification of your ELITE On-Demand ESD Tester.
Wrap up:
By following these instructions and customizing the test settings, you can ensure that your ELITE ESD tester performs accurate and reliable ESD testing.